Bella the Bumblebee
Let's make Bella the Bumblebee, a limited edition Valentine's Bee! 🥳

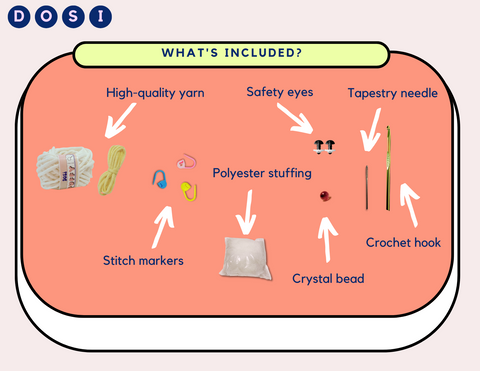
What materials are included in your kit?

- Puffy yarn is a high quality yarn you’ll fall in love with! It’s bouncy, tubular and beginner-friendly.
- Stitch markers help you keep track of where you are.
- Polyester stuffing is used to fill the amigurumi project.
- Crystal bead to go with your completed project (for the good vibes). We placed ours inside the amigurumi with the polyester stuffing.
- Tapestry needle to sew your project together and hide your yarn ends.
- Crochet hook to, of course, crochet :O!
- Scissors are not included, but will be needed for this project.
- P.S. give us a shout at learn@dosidiy.com if you're feeling stuck :)
Basic definitions:
- Amigurumi: crochet animals
How to hold your hook and adjust tension
- The first step to learning how to crochet is to understand how to hold your hook and adjust your tension. This comes with practice, so experimenting with different ways is highly encouraged!
How to make a magic circle
- Let's start crocheting the body of the bee starting with the face using the pink yarn. To start crocheting, we’ll be making a magic circle (also known as a magic ring or magic loop). At its basic form, a magic circle is a circle made with your yarn that is held together with a slip knot and is generally used as the foundation to help you create circular shapes (like amigurumi!). You’ll find that many amigurumi patterns start with a magic circle.
Tips and tricks
- Basic stitches: chain stitch and single crochet stitch (00:12)
- The importance of tensions (1:49)
- How to rotate your hook during stitches (4:00)
- How to leave your work when taking a break and how to come back to your project (6:37)
- Other stitches you might come across in amigurumi, and how it differs from a single crochet stitch (7:54)
How to single crochet (1st round)
- Let's learn how to single crochet by completing the first round in the magic circle. Make sure you have this stitch down before moving on! The single crochet stitch is one of the basic stitches you’ll need to know in order to crochet.
- We'll be crocheting "in the round".
How to single crochet increase (2nd round)
- A single crochet increase will be demonstrated in this next video. An increase, often notated in patterns as "inc", means that 2 stitches will be placed in 1 stitch from the previous round.
- As a result, if you start with 6 single crochet stitches in the 1st round, in the 2nd round you would now have 12 stitches when increasing. If you started with 7 single crochet stitches, you would now have 14, etc.
- In formal pattern terms, this is denoted as "inc x 6 [12]" or "6inc".
We want to make the circle larger while maintaining this circular shape. In order to do so, we'll be incorporating the single crochet and an increase stitch.
- For round 3, place 1 single crochet stitch in the previous round's 1st stitch, then 2 single crochet stitches in the previous round's 2nd stitch. This pattern will continue as "1 sc, 1 inc" until we have 18 stitches.
- In formal pattern terms, this is denoted as "(sc, inc) x 6 [18]"
- Another helpful way to understand this: the 2nd round took on a pattern of 2-2-2-2-2-2 (this is not how patterns are written, but I find this method is easier to understand as a beginner). The 3rd round will take on a pattern of 1-2-1-2-1-2-1-2-1-2-1-2.
Before we go on, here's an important tip on differentiating between the right and wrong side of your work
No increasing stitches for the 4th-5th rounds.
- For the 4th and 5th rounds, we're shaping the bee's head and upper body (continuing with the pink yarn).
- Remember you should be ending each round with 18 stitches. Don't forget to place your stitch marker on every first stitch so you don't lose track of where you are!
- The formal pattern is written as "18 sc".
- Follow the video below for the 4th round, and continue this same pattern for the 5th round. The end of the 5th round will involve a color change, so scroll down to the video below to continue with the remainder of the 5th round :)
- Have your red yarn ready!
- The last stitch of the 5th round helps us transition to the red yarn for the 6th round.
- The 6th round is all red.
- The last stitch of the 6th round helps us transition back to the pink yarn for the 7th round.
Rounds 7-9: 18 single crochet stitches
- These 3 rounds will all be single crochet stitches with no increases using the pink yarn.
- All of these rounds will have 18 single crochet stitches (same steps as rounds 4-5)
Last stitch of round 9 and continuing round 10: another color change
- Have your red yarn ready!
- The last stitch of the 9th round helps us transition to the red yarn for the 10th round.
- The 10th round is all red.
- The last stitch of the 10th round helps us transition back to the pink yarn for the 11th round.
Round 11 Decreasing stitches, stuffing, eyes, blush, and crystal
- A decreasing round is exactly what it sounds like! The # of total stitches for this round will be less than that of the previous round. The decreasing stitch we'll be using today (and the one that's generally recommended for making amigurumi) is called an invisible decrease single crochet stitch.
- We'll be making decreasing stitches in this round to begin closing up the bottom of the bee.
- Once this decreasing round is completed, we'll add the stuffing, crystal eyes, and blush before we completely close up the bottom of the bee. From there, we'll crochet and sew on he heart wings.
- *Note: please do not add the crystal if the holes for your bee are large, if the bee will be handled frequently, or if there are any kids and/or pets around.
Congrats on completing Bella the Bee! :O
- YAY AMAZING JOB!!! Congrats on finishing the Valentine's special edition Bella the Bee 🎉. Tag us on insta @dosidiy so we can see your wonderful creations.
